CarND-Semantic-Segmentation
View the Project on GitHub MarkBroerkens/CarND-Semantic-Segmentation

The Project
In this project, I label the pixels of a road in images using a Fully Convolutional Network (FCN).
Architecture
The approach uses the FCN-8 architecture developed at Berkeley. The encoder for FCN-8 is the VGG16 model pretrained on ImageNet for classification of classes such as differnt animals, vehicles, etc. The fully-connected layers of the pretrained VGG16 are replaced by 1-by-1 convolutions.
The decoder portion of the FCN-8 upsamples the input to the original image size. Example:
# upsample
layer4a_in1 = tf.layers.conv2d_transpose(layer7a_out, num_classes, 4,
	                                 strides= (2, 2),
	                                 padding= 'same',
	                                 kernel_initializer=tf.random_normal_initializer(stddev=weights_initializer_stddev),
	                                 kernel_regularizer= tf.contrib.layers.l2_regularizer(weights_regularized_l2),
	                                 name='l2')
In order to preserve information on where a specific class is located in the input image, skip conections are added.
# make sure the shapes are the same!
# 1x1 convolution of vgg layer 4
layer4a_in2 = tf.layers.conv2d(
          vgg_layer4_out, num_classes, 1,
	  padding= 'same',
	  kernel_initializer= tf.random_normal_initializer(stddev=weights_initializer_stddev),
	  kernel_regularizer= tf.contrib.layers.l2_regularizer(weights_regularized_l2),
	  name='l3')
# skip connection (element-wise addition)
layer4a_out = tf.add(layer4a_in1, layer4a_in2)
Training
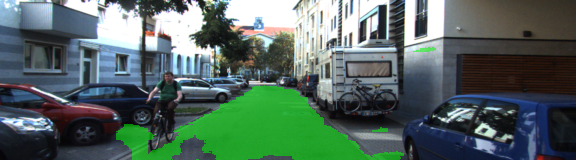
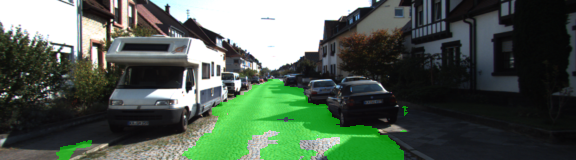
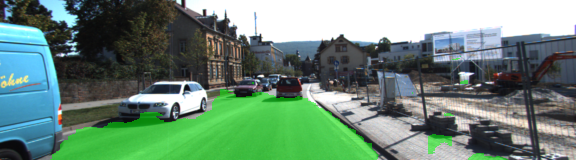
The FCN-8 network is trained on the Kitti Road dataset from here. Which proves road images and related labels which describe which part of the road is considered as road (pink) and non-road (red). Additionally, the label describe other roads in black. However, we only use the pink parts as road and all other labels as non-road.
Example of original road:
Example of original road:

The hyperparameters used for training are:
- keep_prob: 0.5
- learning_rate: 0.0009
- epochs: 50
- batch_size: 3
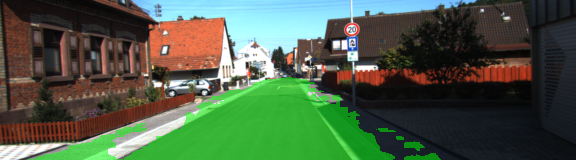
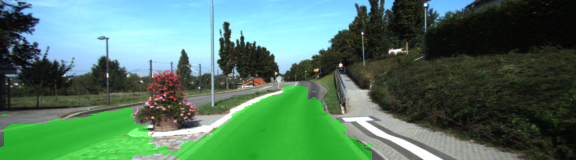
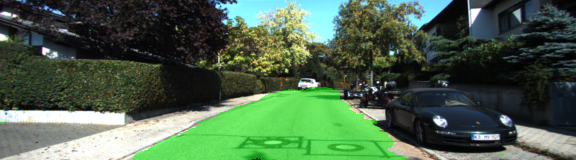
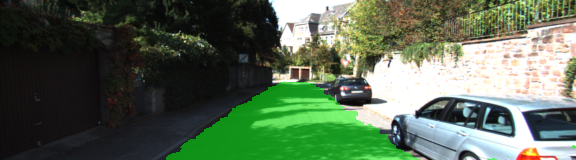
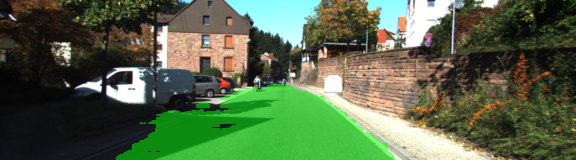
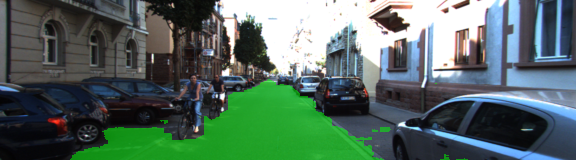
Results
The predictions worked pretty well. However, there are some regions which are incorrectly marked as road or non-road.
Possible improvements
- Augmentation: We could add further training data by
- flipping the images and their lables
- increasing / decreasing the brightness of the images
- shifting the images and the labels
- Freezing the the weights of the pretrained layers we used in in our FCN-8 network.
Some remarks on setting up the encironment for GPU computing
First attempt: NVIDIA GeForce GTX 680MX of my iMac
Since the the Udacity classroom highly recommended to use a GPU I thought that I could use the NVIDIA GPU of my iMac. Thus I set up ubuntu linux, installed the the latest NVIDIA drivers, cuda 10, cudnn 7 and tensorflow-gpu 1.12. After two days of installation I found out that tensorflow-gpu 1.12 requires cuda lavel 3.5 whereas my old GPU only provided 3.0.
Second attempt: NVIDIA Xavier development kit
I then set up my Nvidia Xavier development kit, that provided much more up to date hardware. However, it still took about 6 Minutes per epoche.
Third attempt: Udacity Workspace
The Udacity Workspace provides an Nvidia Tesla K80 GPU, which helped to calculate 50 epochs whith batch size 3 in less than an hour.
Further Reading
- A 2017 Guide to Semantic Segmentation with Deep Learning
- Dense-Segmentation: Pyramid Scene Parsing (PSPnet)
- Skip Layer
- Weight Initialization
- Regularization
the description below is Udacity’s original README for the project repo
Semantic Segmentation
Introduction
In this project, you’ll label the pixels of a road in images using a Fully Convolutional Network (FCN).
Setup
GPU
main.py will check to make sure you are using GPU - if you don’t have a GPU on your system, you can use AWS or another cloud computing platform.
Frameworks and Packages
Make sure you have the following is installed:
- Python 3
- TensorFlow
- NumPy
- SciPy
Dataset
Download the Kitti Road dataset from here. Extract the dataset in the
datafolder. This will create the folderdata_roadwith all the training a test images.
Start
Implement
Implement the code in the main.py module indicated by the “TODO” comments.
The comments indicated with “OPTIONAL” tag are not required to complete.
Run
Run the following command to run the project:
python main.py
Note If running this in Jupyter Notebook system messages, such as those regarding test status, may appear in the terminal rather than the notebook.
Submission
- Ensure you’ve passed all the unit tests.
- Ensure you pass all points on the rubric.
- Submit the following in a zip file.
helper.pymain.pyproject_tests.py- Newest inference images from
runsfolder (all images from the most recent run)
### Tips
- The link for the frozen
VGG16model is hardcoded intohelper.py. The model can be found here. - The model is not vanilla
VGG16, but a fully convolutional version, which already contains the 1x1 convolutions to replace the fully connected layers. Please see this post for more information. A summary of additional points, follow. - The original FCN-8s was trained in stages. The authors later uploaded a version that was trained all at once to their GitHub repo. The version in the GitHub repo has one important difference: The outputs of pooling layers 3 and 4 are scaled before they are fed into the 1x1 convolutions. As a result, some students have found that the model learns much better with the scaling layers included. The model may not converge substantially faster, but may reach a higher IoU and accuracy.
- When adding l2-regularization, setting a regularizer in the arguments of the
tf.layersis not enough. Regularization loss terms must be manually added to your loss function. otherwise regularization is not implemented.
Using GitHub and Creating Effective READMEs
If you are unfamiliar with GitHub , Udacity has a brief GitHub tutorial to get you started. Udacity also provides a more detailed free course on git and GitHub.
To learn about REAMDE files and Markdown, Udacity provides a free course on READMEs, as well.
GitHub also provides a tutorial about creating Markdown files.